Archive for October 2014
- In: Non-Beauty | Unboxing
- 4 Comments
Well well well, an unboxing after a long time! And this one is a new subscription box called She Likes Shoes. From the name you can gather that this is a shoe subscription box, the only one so far in the country. How does it work? You can just go to the How It Works page from She Likes Shoes, or you can read on to see how I did it.

You need to sign up for an account at shelikesshoes.com. Creating an account does not mean you are already subscribed and have to pay; what it does is to allow you to see the shoe closet of the month. This is what I did ever since I found out about SLS, and I was able to peek at their shoe offerings without having to commit yet. October rolled along and I immediately felt affinity to one of their October shoes so I signed up for a 3-month subscription around the tenth. I was immediately billed Php499 through Paypal (their only other payment option is Pesopay), and was set up an automatic billing for the succeeding two months for the same amount (Php499) on the 3rd of each month. In return my account was credited with 1 STEP.

STEPS are the currency that you use to buy SLS shoes. For each month you are subscribed you will receive 1 step. The monthly closet will have three tiers of shoes: about four or five shoes costing 1 step; two or three shoes costing 2 steps; and two or three shoes costing 3 steps. You can easily buy additional steps (at Php500 each) at to allow you to buy the higher tiered shoes. As the one I liked luckily was in the first tier, I didn’t need to get additional steps. Also starting just recently, you can also buy the popular styles from the previous months’ closets (Previous Styles), again by paying through Paypal or Pesopay.

Claiming the selected shoe is quite easy. Just select it from the closet and you will be taken to the details of the shoe. Just select your shoe size then click Get Shoe. The order slip will be revealed and you will need to enter your shipping address and contact number. Click Claim Now to finalize the order. SLS will then get back to you through email to confirm your order, and give you a date window within which you will receive your shoes. My email stated that I will get mine between October 21-27. Well guess what? It arrived on October 21!

My chosen shoe is the Hillary. It is a black patent closed shoe with a bit of platform, pretty much a patent version of a schoolgirl shoe. I’ve been wanting to get one for some time, as this kind of shoe is really well within my style. It costs 1 step. It arrived in a nondescript brown shoe box, wrapped well and padded in soft paper. I could not believe it was so light! The shoe looked pretty imposing and bulky, but it was made of pretty light materials I guess. It was just what I wanted!

The fit is a little loose. I’m a half-size (7.5) and SLS only offers shoes in whole numbers so I ordered an 8. I figured it should be okay since I plan on wearing socks with these shoes. The sole feels really cushy although of course I expect I will need to break it in for a bit.
I am one happy lady with her new shoe! I can’t wait to see what next month’s closet brings. I hope there will be one or two that fits my style. She Likes Shoes designs and produces all the shoes they offer, which is quite amazing. Their usual style for the first tier are sandals or flats, while there is usually a pair of boots in the higher tiers.
Heads up! You will get a free step if you subscribed (not just create an account) within the month of October!
Disclaimer: I subscribed to She Likes Shoes with my own money. I am pleased with the shoe and the service which is why I wrote this post.
Watercolor Workshop by Liz
Posted on: October 21, 2014
- In: Events | Musings | Non-Beauty
- Leave a Comment


One of my highlights for last week was finally attending the Watercolor Workshop by Liz of Project Vanity. I missed the first session and I was so happy that she offered a second session that I signed up as soon as I could! The workshop was held last October 18 at the Commune (a cafe along Dela Costa St, Makati City). My daughter is into art so I thought I’d surprise her with her own slot in the workshop. When we arrived the workshop venue was pretty packed! Liz has lots of watercolor fans!

We were provided with all the materials we needed for the workshop: watercolor paper, a set of beginner’s watercolors, brushes, a mixing palette. After a short lecture on the basics of watercolor, we got our hands dirty and did the drills. In this worksheet we tried different washes (flat wash, graduated, variegated, glazing, dry brush) and textures (stippling, stamping, salting).

Clearly my daughter knew what she was doing. Her worksheet looks so much better. She let drop that she may have done this in her art subject in school already. (??!!)

The participants were really enjoying the drills. That is, until Liz unveiled the application of all those different washes and textures. We were instructed to paint a tree, a garlic bulb, and a landscape, which looked pretty daunting looking at the final products! Liz broke it down into steps (which were all really made up of a combination of the above mentioned washes and textures) which made it all seem easy. This is what I came up with.

Not bad I suppose, although Liz did say that my tree needed more water (the mantra of the workshop!). I really liked doing the landscape!

At some point my daughter decided to paint more trees and a sunset/sunrise, and even had a little cartoon drawing on the bottom right. Grabe, I felt so… behind, at that point.

The experience was really great! I learned a lot of stuff and I went out of there inspired to continue to paint. I definitely have a long way to go, but the workshop taught me that I can learn it even at this stage in my life. Thanks Liz for holding this #watercolorworkshopbyliz!
One of my favorite booths at the recently concluded Blogapalooza 2014 was the one by Flawless. Their booth people are friendly, and the activity was short but fun. After registering at the booth, participants are given three standard darts to try and pop “zits” (balloons). I think each successful pop will net you a loot bag. Something better will probably happen if you were able to pop balloons with all three of your darts. I got two, so I got two loot bags. Each loot bag contained full sizes of the Flawless Stem Cell line’s Day Cream and Night Serum.

Let’s first take a look at the Day Cream. It comes in a white-and-silver theme as with the whole Stem Cell line I think.

The list of ingredients as well as manufacturer information are printed at the back. It also indicates here that the tub contains 15 grams of product. It is made in the Philippines, which is always a good thing in my book. The expiry information is found at the bottom of the tub (not pictured).


When you open it up there is a plastic protecting inner lid before you see the actual product. This keeps things hygienic, although of course it always helps if your hands are clean before applying this.

After removing the inner lid you’ll see the actual day cream. This is one of the densest and firmest creams I’ve ever tried. Both of my tubs of day cream have this consistency. It makes it a little hard to apply onto the face, but it warms and softens up when applied with fingers. I have only used it for maybe a week so I haven’t seen any big improvements yet, but it does keep my face moisturized.

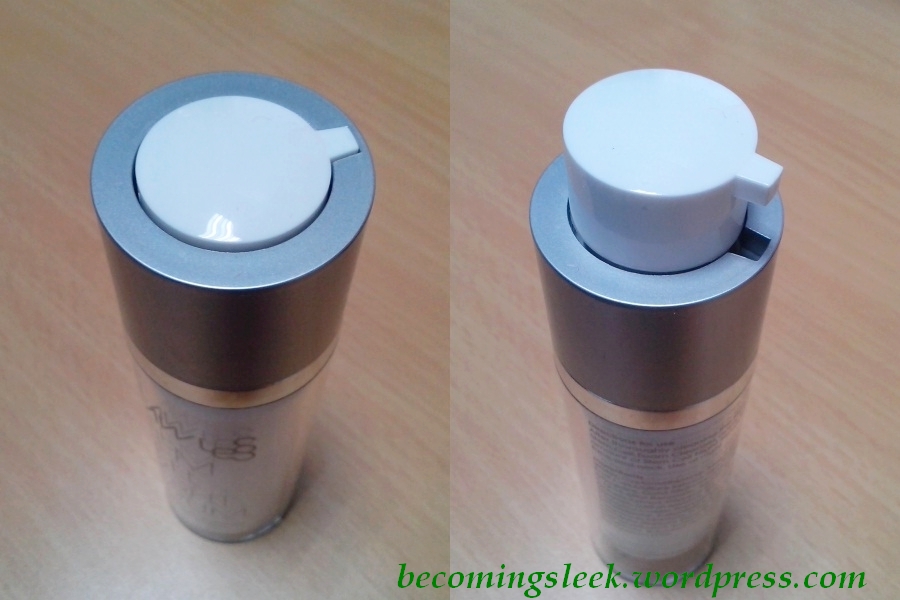
Now we come to the Night Serum. Again it comes in that same packaging theme of white-and-silver. This is actually just a plastic bottle but it looks more luxe than it feels.

Ingredients and manufacturing information are at the back. This contains 15ml of product.

What I like about this bottle is the pump mechanism. The pump itself is depressed into the tube, and you can reveal it by twisting the upper portion until the pump emerges. At that point you can use it the usual way that pumps are used. It does have a tendency to twist back down, so one has to be careful with that.
Here is a tiny amount of serum. It has a good consistency, not very watery nor too thick either. I use this with my night routine, after the Etude House Moistfull Collagen Essence, but before the ZA Perfect Solution Restoring Collagen Cream. I like how this feels on my skin, but it takes a bit of time absorbing compared to Japanese/Korean products.

Here is the same serum, blended. This is the stage where it’s newly smoothened out on the skin and not yet absorbed.

These products is available at Flawless beauty centers and at their website.
I’m definitely obsessed with eyebrows recently, and I’m trying very hard not to accumulate too many eyebrow products as I only have two brows! One of my recent acquisitions in one of my moments of weakness is this Daiso Japan Eyebrow Pencil. Actually, I’m not quite sure if that is the brand of this pencil, as for some reason I threw away its packaging. Absent-minded blogger moment there.

It’s a very simple product really. It’s an eyebrow pencil in a brown shade basically. The pencil is pink with brown dots, and it has a silver cap. I really like the tiny rose detail. It reflects what I usually associate with Japanese products, the cuteness.

At the back is some stuff written in Japanese. The interesting part here is that this pencil has 1.7 grams of product (which may or may not include the actual wood of the pencil itself), and that it’s made in Korea.

The pencil tip itself looks like any regular writing pencil. It has a hard “lead” that works pretty well with brows. It’s not an automatic pencil, which means it has to be sharpened with a sharpener when it loses that nice pointy tip.

This arm swatch doesn’t give it justice, I think. Here it looks like it’s yet another light brown shade, which will probably not suit the brows of someone with undyed hair.

On my brows though it’s another matter. It looks pretty dark and actually matches my hair color. It’s quite easy to use as well, and scratches the lazy girl itch handily. Good eyebrow pencils can draw and complete the brow the fastest (compared to eyebrow powders and mascaras). On a lazy day I’ll just draw a hasty brow and put on a lip balm and I’m out the door in five minutes! Quite convenient really.
This pencil set me back by just Php85.
Pros: convenient; very affordable; matches my hair color
Cons: needs to be sharpened; unknown brand
Daiso Japan has many branches! The one I’m most familiar with are Glorietta 3, Robinson’s Galleria, and Trinoma. Connect with them at their Facebook page and Twitter.
Win a Jergens Gift Pack!
Posted on: October 15, 2014
- In: Giveaways
- 22 Comments
A short and sweet giveaway brought to us by the wonderful folk at Jergens (Vibelle)!

Photo shown does not indicate the actual prize pack
Mechanics are simple:
1. Tweet the following with the included hashtag. You can tweet as many times as you like.
@becomingsleek and @jergens_vibelle are giving away a Jergens Gift Pack! https://becomingsleek.wordpress.com/2014/10/15/win-a-jergens-gift-pack/ #BecomingSleekxJergensPH
2. Comment below your name, email address, and twitter handle.
Rules:
Contest runs from today until October 20 midnight Manila time. The winner will be randomly drawn. I will be announcing the winner on this blog as well as on the Becoming Sleek facebook and twitter pages once I evaluate the entries, and will be notified through the provided email address. She/he will be given 24 hours to respond after which I will draw another winner. Readers 18 years old and above are allowed to join. Jergens/Vibelle will ship the prize to the winner. Philippine addresses only!
The winner was drawn using random.org.

And the winner is: Glaiza Binayas @glaizapixie! Congratulations! Please wait for an email from Jergens regarding your prize.
Event: Blogapalooza 2014
Posted on: October 13, 2014
- In: Events
- 8 Comments
This year I got the chance to once again attend Blogapalooza. This year was bigger, with a lot of participating brands, and a mind boggling 700 participating bloggers and social media experts. Blogapalooza is a Business-to-Blogger event that aims to provide brands with direct access to bloggers and their readers. It happened last October 11 at the SMX Convention Center at SM Aura.

Read on to find out more about what went down at Blogapalooza 2014!
Jergens 7-Day Challenge
Posted on: October 8, 2014
- In: Events
- 5 Comments
Are you familiar with Jergens lotion? If you’re like me, you probably grew up with some variant of Jergens lying around your house. My mom is a huge fan of this brand as it’s very mild and yet quite moisturizing. I took after her and started using Jergens starting from my teens. I’ve tried other brands of course, but there’s nothing like the “basics” to get my skin back to its youthful glow without getting my sensitive skin worked up.
This is why I didn’t hesitate to take up the 7-Day Challenge that Vibelle set up! It was a very intriguing activity and I was even more pumped when I received my challenge kit (below). I will be updating this post with the challenge for the day and what I did. Keep your eyes peeled!
Mission 1: Radiate beauty from within
I am so tickled with the “Mission” part! It really feels like I’m some sort of secret agent! Anyway, this mission is to radiate beauty from within by sharing the bottle of Jergens lotion from the challenge kit with a complete stranger. I will be completely honest: this is probably one of the hardest things I can be challenged with. I have big stranger anxiety and I couldn’t find a good way to approach a stranger for this challenge. I did the next best thing: I gave my bottle of Jergens lotion to the person in the office I feel the least connection to.

Meet Sheila. She is the company cleaning lady. I chose her because 1) I feel that I don’t know her that much and 2) this is a great way to appreciate her work, with a gift. I shyly asked if she would be okay accepting the gift and posing for a picture. As you can see, she was quite ecstatic to receive it, and was a quite tickled with having her picture taken. I’m happy I chose her; it seemed to have made her day!
Mission 2: LEFT vs RIGHT
Today’s mission is to compare skin that has Jergens applied on versus skin that is bare. I used the Jergens Ultra Healing lotion provided in the challenge kit. This lotion has an illuminating Hydralucence blend and Vitamins C, E, and B5 to address extra dry skin. This is actually my go-to Jergens variant, and I felt quite nostalgic when I took in that familiar clean scent.

As you can see here (click the photo for a larger version!), my left arm (where I applied the Jergens Ultra Healing) is very luminous, alive, and smooth-looking. In contrast my bare right arm looks really tired and absolutely dry. I really love how immediately obvious the effects of the lotion is by making my skin look more alive.
Mission 3: Keep Hydrated
This mission sounds pretty straightforward: using the tumbler included in the challenge kit, drink water and take a photo of the tumbler every time it gets refilled. Hydration is the name of the game! Keeping hydrated is a great way to hydrate the skin which will then result into healthier and more glowing skin. I, however, found it quite the challenge! Firstly I couldn’t figure out how to put timestamping on my camera, so I just.. put my watch next to my tumbler. The second and more difficult challenge is not drinking anything else for this day! I’m not a soda drinker by any means, but I am an avid coffee drinker. I could not properly function without a cup, but I took the challenge and drank only water! Here are my photos.


I didn’t really think it was difficult to drink water, since I drink a lot of water everyday. The challenge of not drinking anything else (coffee in particular!) had me stumped, and to be honest it did affect my mood for most of the afternoon. I felt lethargic and irritable at the same time, which made me realize just how dependent I am to that drink. My skin, on the other hand, never felt so nice with all the extra water I’ve been drinking. I am loving how many insights I am getting with these challenges!
Mission 4: Nurture Relationships
This mission took a while to execute because of some logistics issues. I am tasked to take out my mom or my best girl pal on a surprise dinner at Cabalen care of Jergens. Unfortunately my mom is out of the country at the moment, and my gal pals are not available. I took my best friend out instead.

It just so happens that I married my best friend! My husband and I have been together for 14 years (gasp!) and married for 9. One of our favorite things to bond over is food, so this mission just seemed so apt. We had a great time at dinner as usual, and I definitely appreciate this chance to try out Cabalen. Thank you Jergens!
Mission 5: Make Someone Smile
Jergens would like you to smile! They are graciously giving away a Jergens gift pack through Becoming Sleek. Click here for the actual giveaway and you might win yourself a Jergens gift pack!
Mission 6: Healthy Habits
This mission gives me the opportunity to share with you one of my favorite healthy recipes that includes an ingredient good for the skin. I’m supposed to share a family recipe but I don’t have many of those (my mom isn’t the cooking type unfortunately). I learned this recipe on my own, as with most of the recipes I know. I got this from a book called Just Bento, and I even published a blog post way back when I was still doing food blogging. This recipe of Stewed Chicken and Carrots contain, well, carrots! Carrots have beta carotene, which gives us Vitamin A and is also an antioxidant, both are good for the skin. Without further ado, here is the recipe! PS: This was copied word for word from my food blog, Baon Ko Bento.
Stewed Chicken and Carrots
Basic tsukune, modified
- 600 grams ground chicken
- 1 finely grated medium carrrot
- 1/2 tsp salt
- 1 egg minus a bit of egg white
- 3-4 tbs cornstarch
I just dumped everything into a bowl and mixed them all up until they resemble a very smooth but slightly wet paste. I didn’t have any ginger on hand (the original recipe calls for about half a tablespoon of it) so I simply omitted it. I don’t know what was wrong with my ground chicken, but it does look like it’s too wet to hold solid when dropped into the broth. Anyway, once I had the chicken mixture ready, I mixed up the broth.
Broth
- 2 1/2 cups water
- 2 tbs sake
- 2 tbs mirin
- 2 1/2 tbs dark soy sauce
- 2 medium carrots, sliced into small pieces
I just put the broth ingredients into a large sauce pan, brought it to a boil, and dropped teaspoonfuls of the chicken mixture into the hot broth. I was expecting it to all fall apart once it hit the liquid, but to my surprise it stuck together. I left it to boil for around 15 minutes, and turned off the heat.
Here is how it looks like when done. I really love this because it’s quite easy to make, and you can put as much carrots as you want in it. It also keeps well in a baon container and reheats nicely in a microwave. Back when I was still bringing baon to work this was one of my favorite things to make.

Mission 7: The Finish Line
I can’t believe I’m at the finish line of this very interesting challenge! Today I am supposed to take a similar full-body photo of me three months ago, and compare it to a similar one today. Here’s my comparison photo.

It wasn’t really my intention but it turns out I wore the same shirt even. I really like how my skin looks more radiant and feels more smooth with the constant use of Jergens Ultra Healing Lotion. I also feel more confident after completing this challenge. Thank you Jergens and Vibelle for letting me participate!
Connect with Jergens on Facebook, Instagram, and Twitter by simply clicking on the links I’ve provided.
- In: Reviews | Swatches
- 10 Comments
One of the recent things I’ve been testing is K-Palette Real Lasting Eyebrow Mascara in Natural Brown. I got this in reaction to Maybelline Fashion Brow Brow Mascara – I thought its brush was too big for my brows. I got interested in this product by reading fellow bloggers’ reviews, and the reviews were mainly positive. This costs Php595 and is available at Beauty Bar.

The tube is short and squat and clear, showing the actual shade of the product. The cap is a nondescript black that holds the wand. The name of the product is clearly printed in gold.

The shade number is printed on the opposite side. 102 here refers to the darker of the two available shades: Natural Brown.

Here’s a close up of the wand. This is the main reason I got this. It has a very small oval brush.

Here’s a profile shot of the wand tip. You can see that the bristles are pretty short. They are also quite stiff, and is perfect to apply the mascara onto the brows.

Here’s an arm swatch. The left is a single swipe while the right is kind of smudged, the kind I imagine it would look like on the brows.

And here it is on my brows. As you can see it seems to keep my brow hairs firmly in place and look really well groomed. I am wearing the K-Palette Brow Mascara over In2It Eyebrow Powder.

Upon closer inspection, Natural Brown actually still is quite too light for me.

In conclusion: I really like this product, even if it’s a bit too light on me. I am hoping that K-Palette releases a darker shade soon!
Pros: keeps brow hairs in place; correctly-sized brush; cruelty-free
Cons: shade still too light
K-Palette is cruelty-free, and is available at Beauty Bar.